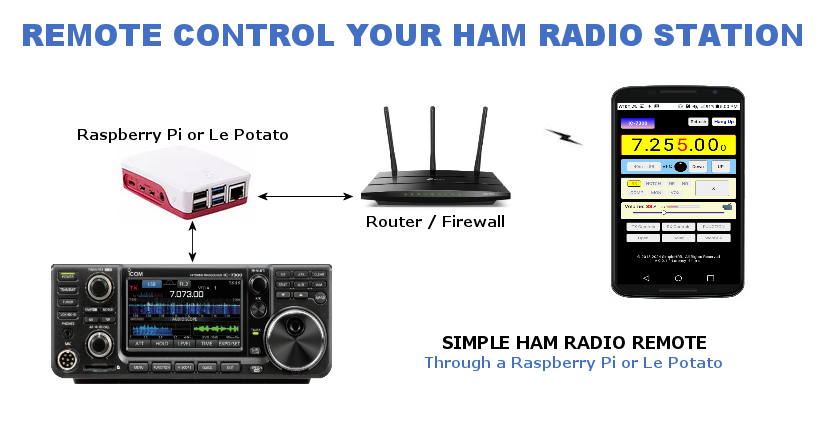
Ham Radio Remote Through Le Potato
This post is about how to enable Simple Ham Radio Remote to boot on a Libre Le Potato. Libre is a company making single board computers that are much more open-sourced than the Raspberry Pi (especially when it comes to hardware). The Libre Computer Le Potato is marketed as a Raspberry Pi alternative.
Yes, it's possible to convert the Libre Le Potato to Raspbian using the Libre Computer Raspbian Portability tool. This conversion requires Simple Ham Radio Remote image installed on a Raspberry Pi.
System requirements
- Ham Radio Callsign
- Chrome or Firefox web browser
- Admin access to your router
- Active Internet connection
Hardware required
- Icom, Yeasu HF radio
- microSD card adapter
- microSD card (16GB class 10 or larger)
- Raspberry Pi (3B - 3B+ armv7l)
- Le Potato Libre computer
- 5v Power Supply 3A minimum
- Cat5 Ethernet cable
- USB Audio Adapter
- Audio Radio Interface
- USB Serial Adapter
- Serial to CI-V Converter
- USB Type A Male to B Male Cable
- USB - Bluetooth - 2.4GHz Wireless mouse with a scroll wheel (Optional)
- Computer with a microSD slot (or appropriate SD card adapter)
Download, Install the image onto your microSD card
- This image contains everything you need to get up and running quickly.
-
Download: SimpleHRR v0.2.1-f
Sorry for the inconvenience, you might have to close the Dropbox tab when the download has finished.
Windows: Install the Image onto your microSD card
-
Download: SimpleHRR v0.2.1-f
- Extract the image double-click the .zip file then click Extract All.
- Insert the microSD card into the computer's SD card slot use the SD card adapter if needed.
- Next, flash the image to the microSD card with your favorite image writer. There are various image writer you can use, example Etcher - Raspberry Pi Imager works for Linux, macOS or Windows.
- Now remove the flashed microSD from the computer, keep it in a save place will insert it into the Raspberry Pi later.
Prepare the Radio for Remote Operation
Icom
IC 7300 Click to select radio
IC-7300 Firmware version should be at least 1.2 or higher.
-
* = Default
- * ACC/USB -> Output Select: AF
- * ACC/USB -> Output Level: 50%
- * USB MOD -> Level: 50%
- ** DATA OFF MOD: USB MIC,ACC
- * CI-V -> CI-V Baud Rate: Auto
- * CI-V -> CI-V Address: 94h
- * CI-V -> CI-V Transceive: ON
- * CI-V -> CI-V Output (for ANT): OFF
- * CI-V -> CI-V USB Port: Unlink from [REMOTE]
- * CI-V -> CI-V USB Baud Rate: Auto
- ** CI-V -> CI-V USB Echo Back: ON OFF
- * USB Serial Function: CI-V
- * USB Send/Keying -> USB SEND: OFF
- * USB Send/Keying -> USB Keying (CW): OFF
- * USB Send/Keying -> USB Keying (RTTY): OFF
** = Change
Menu -> Set -> Connectors ->
-
Menu -> SET -> Function ->
- Time-Out Timer (CI-V): 3min
IC 7610 Click to select radio
IC-7610 Firmware version should be at least 1.3 or higher.
-
* = Default
- * ACC AF/IF Output -> Output Select: AF
- * ACC AF/IF Output -> AF Output Level: 50%
- * ACC AF/IF Output -> AF SQL: OFF (OPEN)
- * USB AF/IF Output -> Output Select: AF
- * USB AF/IF Output -> AF Output Level: 50%
- * USB AF/IF Output -> AF SQL: OFF (OPEN)
- * MOD Input -> USB MOD Level: 50%
- ** MOD Input -> DATA OFF MOD: USB
- * CI-V -> CI-V Baud Rate: Auto
- * CI-V -> CI-V Address: 98h
- * CI-V -> CI-V Transceive: ON
- * CI-V -> CI-V Output (for ANT): OFF
- * CI-V -> CI-V USB Port: Unlink from [REMOTE]
- * CI-V -> CI-V USB Baud Rate: Auto
- ** CI-V -> CI-V USB Echo Back: ON
- * USB SEND KEYING -> USB SEND: OFF
- * USB SEND KEYING -> USB Keying(CW): OFF
- * USB SEND KEYING -> USB Keying(RTTY): OFF
- * USB SEND KEYING -> Inhibit Timer at USB Connection: ON
** = Change
Menu -> Set -> Connectors ->
-
Menu -> SET -> Function ->
- Time-Out Timer (CI-V): ON - 3min
IC 756PROII & III Click to select radio
-
Menu -> Set -> Miscellaneous (others) set mode ->
- CI-V -> CI-V Baud Rate: 9600
- CI-V -> CI-V Address: 53h
- CI-V -> CI-V Transceive: ON
-
Additional Hardware:
- USB Serial adapter Here ✓
- Serial to CI-V adapter Here ✓
- USB Audio adapter Here ✓
- Audio interface Here ✓
- Power On-OFF Relay module to GPIO 23 Here ✓
-
Radio Controls ->
- AF Volume Control -> pre-set 15 adjustable in web app
- Radio Interface between Radio / Raspberry Pi Required -> Here ✓
Yaesu
FT 450 Click to select radio
-
Menu Mode ->
- CATRATE -> Select: 9600
- CAT RTS -> Select: OFF
- TOT (TOT TIME) -> Select: ON - 3min
-
Radio Controls ->
- AF Volume Control -> pre-set 15 adjustable in web app
- Radio Interface between Radio / Raspberry Pi Required -> Here ✓
FT 950 Click to select radio
-
Menu Mode ->
- 026 GENE CAT BPS -> Select: 9600
- 028 GENE CAT RTS -> Select: OFF
- 031 GENE TX TOT -> Select: ON - 3min
-
Radio Controls ->
- AF Volume Control -> pre-set 15 adjustable in web app
- Radio Interface between Radio / Raspberry Pi Required -> Here ✓
FT 2000 Click to select radio
-
Menu Mode ->
- 028 GEnE CAT BPS -> Select: 9600
- 030 GEnE CAT RTS -> Select: OFF
- 035 GEnE TX TOT -> Select: ON - 3min
-
Radio Controls ->
- AF Volume Control -> pre-set 15 adjustable in web app
- Radio Interface between Radio / Raspberry Pi Required -> Here ✓
Connect the Radio to the Raspberry Pi
- ICom - Plug the USB cable into the Raspberry Pi the other end into the radio
- Yaesu non USB, Plug the USB Audio Adapter into the Raspberry Pi, the mic-spkr to the Radio Interface. Mic-spkr from the Interface to the mic-spkr on the radio. Plug the USB Serial Adapter into the Raspberry Pi. Plug the Serial end into the Radio Serial port.
Connect the Raspberry Pi to Network
- Plug the Cat5 cable into the Raspberry Pi Ethernet port the other end to the LAN.
Booting the Raspberry Pi for the First Time
- Insert the flashed microSD card into the Raspberry Pi microSD slot.
- Power ON the Radio.
- Power ON the Raspberry Pi.
- Wait for the Pi to boot up - the green LED should stop flashing when it's finished!.
Get the Raspberry Pi IP Address
- Open a browser and Log in to your router as admin. The router IP address is usually something like 192.168.0.1, 192.168.1.1 or 192.168.1.254 or 10.0.0.1
- Find Attached Devices -> Device Name (Raspberry Pi simplehrr) - IP Address
(something like 192.168.x.x or 10.x.x.x). - Write down or copy the corresponds IP Address you will need that to set up Simple Ham Radio Remote.
Set up Simple Ham Radio Remote on your Raspberry Pi
- Turn the radio ON
- Open a Chrome or Firefox web browser enter the URL:
https://your-Pi's-IP-address:50000/remote - Enter Username: Ham Radio Callsign (confirmed on QRZ.com)
- Enter Email address: Optional: Just leave noemail@noemail.com
- Enter Password: (greater then 8 char)
- Select Radio:
- Select Dev USB: (/dev/ttyUSB0)
- Click [ Activate ]
- Verify the information is correct Click [ OK ]
- Wait 1 minute for Raspberry Pi to reboot
- Click [ OK ]
- Enter Username: (your Callsign)
- Enter Password: (your Password)
- Click [ Sign in ]
- Click [ Call Radio ] (when it turns green)
Be patient it takes a little longer to turn green on a first time install.
Logout:
- Do not Hang Up
Now that you have a fully funtional Raspberry Pi ham radio remote.
Shutdown the Raspberry Pi click [ FUNTION ] Raspberry Pi [ Shutdown ] [ YES ] [ YES ]
Once the green LED stops blinking and turns off for 10 seconds.
Power OFF the Raspberry Pi.
Wait 10 to 15 seconds. Then Power ON the Raspberry Pi.
Now let's enable Raspbian to Boot on the Le Potato
Raspberry Pi booted and ready.
- SSH into the Raspberry Pi PuTTY
See Resources -> User Manual:
Login to your Raspberry Pi - Install git:
sudo apt install git -y
- Now clone the Libre Raspbian Portability Tool GitHub Repository:
git clone https://github.com/libre-computer-project/libretech-raspbian-portability.git lrp
- Next let's run a command to get the available board types:
sudo lrp/oneshot.sh
- Then run the same command but specifying the correct board type after oneshot.sh:
sudo lrp/oneshot.sh aml-s905x-cc
If you don't see "Modifications complete" Then run the following commands:
wget https://deb.libre.computer/repo/pool/main/libr/libretech-keyring/libretech-keyring_2024.05.19_all.deb
sudo dpkg -i libretech-keyring_2024.05.19_all.deb
sudo apt update
Now run this command again:
sudo lrp/oneshot.sh aml-s905x-cc
You should see:
Modifications complete. Press any key to shutdown. Once the green LED stops blinking and turns off for 10 seconds, remove power and move the MicroSD card to the Le Potato.
Press: [ Enter ]
Turn the Raspberry Pi OFF, Wait 10 to 15 seconds. Then Power ON the Raspberry Pi.Wait for the Raspberry Pi to boot up, it takes about one or two minutes.
Open a Chrome or Firefox browserURL https:// [raspberrypi ip address] :50000/remote
Sign in
Make sure that everything working.
Do not Hang Up
Before powering down the Raspberry Pi:
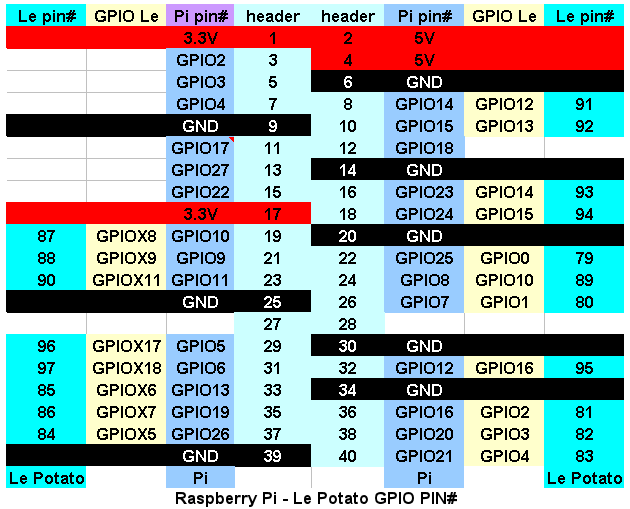
- SSH into the Raspberry Pi to set the Le Potato GPIO pins
cd /home/pi/simplehrr-icom-yaesu
node set-up.js
Select -> 2 [ Enter ]
Type: 93-94 Press [ Enter ]
You should see: update Will take effect next login.
If you do not see that flash by: Run option 2 again.- Close the SSH session
Shutdown the Raspberry Pi click [ FUNTION ] Raspberry Pi [ Shutdown ] [ YES ] [ YES ]
Wait for the green LED to stops blinking and turns off for 10 seconds.
The power OFF the Raspberry Pi and Remove microSD card
Replace the Raspberry Pi with the Le Potato
- Insert the microSD card Le Potato SD slot
- Power ON the Le Potato. It takes about one or two minutes to boot.
- Open Chrom or Firefox browser
- URL https:// [lebre computer ip address] :50000/remote
Sign in
Make sure that everything working.
Simple Ham radio Remote should funtion just like it did on the Raspberry Pi.
If your going to switch back to the Raspberry Pi do not Hang Up.
Hang Up if your not switch back to the Raspberry Pi.
Before switching back to the Raspberry Pi:
- SSH into the Le Potato to set the Raspberry Pi GPIO pins
cd /home/pi/simplehrr-icom-yaesu
node set-up.js
Select -> 2 [ Enter ]
Type: 23-24 Press [ Enter ]
You should see: update Will take effect next login.
If you do not see that flash by: Run option 2 again.- Close the SSH session
Shutdown the Le Potato click [ FUNTION ] Raspberry Pi [ Shutdown ] [ YES ] [ YES ]
Wait 30 seconds before Powering OFF the Le Potato and Remove SD card.
Replace the Le Potato with the Raspberry Pi.
Conclusion
That's it Simple Ham Radio Remote fully functional on the Raspberry Pi and the Le Potato. I am sure there will be some issues but so far all working as expected. This microSD card can now be used to boot Simple Ham Radio Remote on a Raspberry Pi or the Le Potato.