Ham Radio Remote Control The IC 2730
Ham Radio Remote Control the Icom IC-2730 Dual Band VHF/UHF 50W Mobile Radio with Simple Ham Radio Remote Software and a Raspberry Pi.
If your looking for a means to remote control the IC-2730 ham radio transceivers over the local area network or the internet. Simple ham radio remote IC-2730 might be what you are looking for.
The IC-2730 has a very limited number of CI-V commands but there are just enough commands to remote control the radio.
Always review the FCC rules - regulation before operating any two-way radio remotely.

Simple Ham Radio Remote IC 2730 is a free web app. It comes preinstalled on a Raspbian Lite Image which is flashed onto an 8GB or larger microSD card using your favorite software to flash microSD cards. There is no additional software to install.
System requirements
- Ham Radio Callsign
- Chrome or Firefox web browser
- Admin access to your router
- Active Internet connection
Hardware required
- Icom IC-2730
- micro SD card adapter
- micro SD card (8GB class 10 or larger)
- Raspberry Pi (3B - 3B+ or 4B armv7l)
- Raspberry Pi Power Supply 2.5A - (3A - 3.5A better)
- Cat5 Ethernet cable
- USB Audio Adapter
- USB Serial Adapter
- Icom IC-OPC-589 8 Pin to Modular Microphone Adapter (optional)
- Computer with an SD slot (or an appropriate SD card adapter)
- There is additional hardware in Prepare the IC 2730 for Remote Operation
Download, Install the Image onto your microSD card
- This image contains everything you need to get up and running quickly.
- Download: SimpleHRR IC2730 v0.2.1-T.
Simple ham Radio Remote simplehrr-icom-2730 Current release...
Windows: Install the Image onto your microSD card
- Download: SimpleHRR IC2730 v0.2.1-T.
- Extract the image double-click the .zip file then click Extract All.
- Insert the microSD card into the computer's SD card slot use the SD card adapter if needed.
- Next, flash the image to the microSD card with your favorite image writer. There are various image writer you can use, example Etcher - Raspberry Pi Imager works for Linux, macOS or Windows.
- Now remove the flashed microSD from the computer, keep it in a save place will insert it into the Raspberry Pi later.
Prepare the IC 2730 for Remote Operation
-
MENU -- EXMENU [MV]
- CIV ADR [MV] CIV AD-- 90
- CIV BAU [MV] CIV BA-- AUTO
- CIV TRN [MV] CIV TR-- ON
EXMEN-- FUNC [MV]
FUNC -- CI-V [MV]
-
Additional Hardware:
- USB Serial adapter Here ✓
- Serial to CI-V adapter Here ✓
- USB Audio adapter Here ✓
- Audio interface Here ✓
- Power On-OFF Relay module to GPIO 23 Here ✓
- Push-to-Talk (PTT) Relay module to GPIO 24 Here ✓
-
Radio Controls ->
- AF Volume Control -> pre-set 15 adjustable in web app
- Radio Interface between Radio / Raspberry Pi Required -> Here ✓
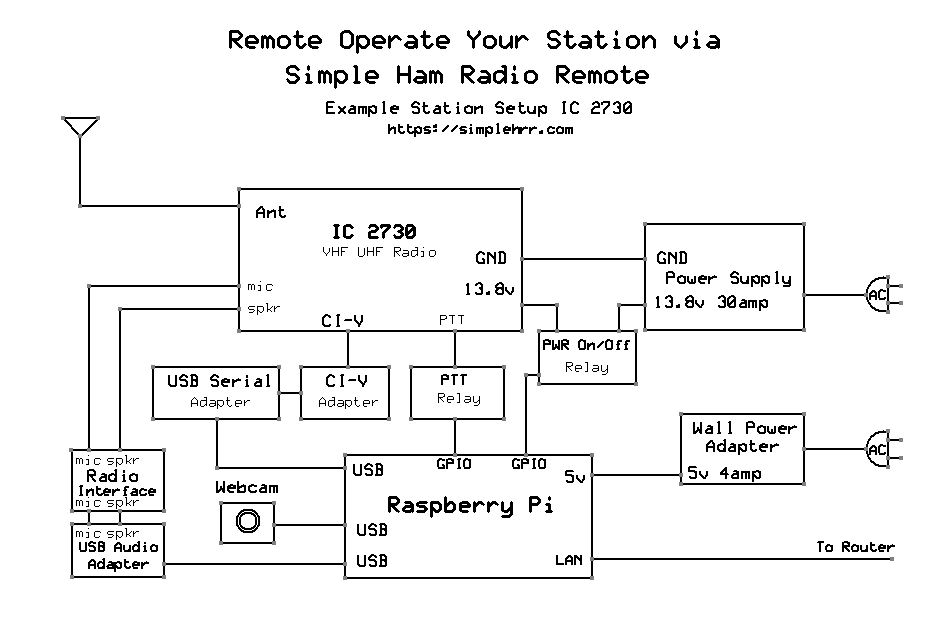
Connect the Radio to the Raspberry Pi
Click to show Diagram

Click image to enlarge
Connect the Raspberry Pi to Network
- Plug the Cat5 cable into the Raspberry Pi Ethernet port the other end to the LAN.
Booting the Raspberry Pi for the First Time
- Insert the flashed microSD card into the Raspberry Pi microSD slot.
- Power ON the Radio (e.g IC-2730).
- Power ON the Raspberry Pi.
- Wait for the Pi to boot up - the green LED should stop flashing when it's finished!.
Get the Raspberry Pi IP Address
- Open a browser and Log in to your router as admin. The router IP address is usually something like 192.168.0.1, 192.168.1.1 or 192.168.1.254 or 10.0.0.1
- Find Attached Devices -> Device Name (Raspberry Pi simplehrr) - IP Address
(something like 192.168.x.x or 10.x.x.x). - Write down or copy the corresponds IP Address you will need that to set up Simple Ham Radio Remote.
Set up Simple Ham Radio Remote on your Raspberry Pi
- Turn the radio ON
- Open a Chrome or Firefox web browser enter the URL:
https://your-Pi's-IP-address:50000/remote - Enter Username: Ham Radio Callsign (confirmed on QRZ.com)
- Enter Email address: Optional: Just leave noemail@noemail.com
- Enter Password: (greater then 8 char)
- Select Radio: (IC-2730)
- Select Dev USB: (/dev/ttyUSB0)
- Click [ Activate ]
- Verify the information is correct Click [ OK ]
- Wait 1 minute for Raspberry Pi to reboot.
- Click [ OK ]
- Enter Username (your Callsign)
- Enter Password (your Password)
- Click [ Sign in ]
- Click [ Call Radio ] when it turns green.
Be patient it takes a little longer to turn green on a first time install.
Logout:
- Click [ Hang Up ]
That's it.
Read me:
- The first boot takes about 2+ minutes because all SimpleHRR prerequisites are installed during the first boot. Wait 2 minutes, then start checking https://your-Pi's-IP-address:50000/remote.
- If you don't have the selected radio connected to the USB-Serial port, when you click [ Call Radio ], you will get an error message "Unable to Connect to Radio!".
- This installation is for LAN access only. See user manual for Internet access.
- Access the user manual using your username and password the day after setting up SimpleHRR.
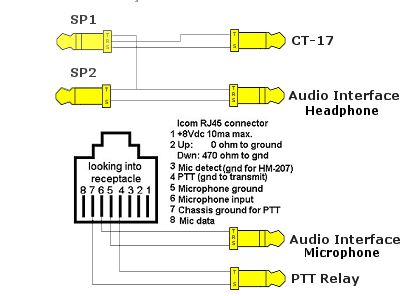
Click to see Wiring Diagram between the IC 2730 and Audio Interface

Click image to enlarge
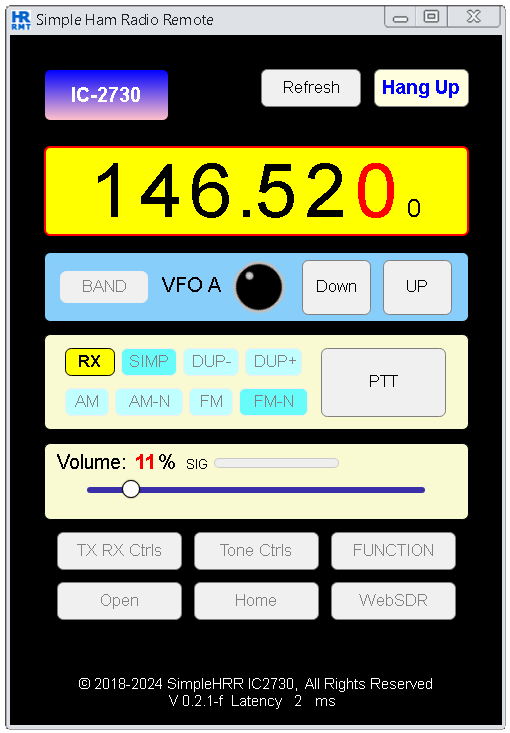
- Click VFO A to toggle between VFO A (Left) - VFO B (Right)
- Always review the FCC rules - regulation before operating any two-way radio remotely
- Current Release notes:
Simple ham radio remote web app is fully functional, but still in the process of refining some aspects of the web app.
Check back periodically to download the most recent release.
2026-02-04-0.2.1-T-simplehrr-icom-2730-lite.zip
New Trixie release.
Fixed VFO A - VFO B selector.
Fixed some minor issues.
2024-10-25-0.2.1-f-simplehrr-icom-2730-lite.zip
Added webcam poup
Added "Stand by" gpio power On to let radio boot up Fixed app not loading when freq out of band
2024-08-22-0.2.1-f-simplehrr-icom-2730-lite.zip
Fixed some issues
2024-07-25-0.2.1-f-simplehrr-icom-2730-lite.zip
New Band button
New VFO A - VFO B selector.
Cleaned up Tone Ctrls.
It's looking good.
2024-07-21-0.2.1-f-simplehrr-icom-2730-lite.zip
First Simple Ham Radio Remote Icom ic 2730 release
This release still very rough but this is how it starts.
