
Simple Ham Radio Remote
Installation Guide
Simple Ham Radio Remote is a free web app. To streamline the installation process, it comes preinstalled on a Raspbian Lite Image which is flashed onto an 8GB or larger microSD card using your favorite software to flash microSD cards. There is No additional software to install.
.")
System requirements
- Ham Radio Callsign
- Chrome or Firefox web browser
- Admin access to your router
- Active Internet connection
Hardware required
- Icom, Yeasu HF radio
- microSD card adapter
- microSD card 8GB class 10 minimum, (13GB class 10 minimum for Le Potato conversion) or larger
- Raspberry Pi (3B - 3B+ or 4B armv7l)
- Raspberry Pi Power Supply 3A minimum
- Cat5 Ethernet cable
- USB Audio Adapter
- Audio Radio Interface
- USB Serial Adapter
- Serial to CI-V Converter
- USB Type A Male to B Male Cable
- USB - Bluetooth - 2.4GHz Wireless mouse with a scroll wheel (Optional)
- Computer with a microSD slot (or appropriate SD card adapter)
Download, Install the image onto your microSD card
- This image contains everything you need to get up and running quickly.
-
Download: SimpleHRR v0.2.1-T-a
Simple ham Radio Remote simplehrr-icom-yaesu Current release...
Windows: Install the Image onto your microSD card
-
Download: SimpleHRR v0.2.1-T-a
- Extract the image double-click the .zip file then click Extract All.
- Insert the microSD card into the computer's SD card slot use the SD card adapter if needed.
- Next, flash the image to the microSD card with your favorite image writer. There are various image writer you can use, example Etcher - Raspberry Pi Imager works for Linux, macOS or Windows.
- Now remove the flashed microSD from the computer, keep it in a save place will insert it into the Raspberry Pi later.
Prepare the Radio for Remote Operation
Icom
IC 7300 Click to select radio
IC-7300 Firmware version should be at least 1.2 or higher.
-
* = Default
- * ACC/USB -> Output Select: AF
- * ACC/USB -> Output Level: 50%
- * USB MOD -> Level: 50%
- ** DATA OFF MOD: USB MIC,ACC
- * CI-V -> CI-V Baud Rate: Auto
- * CI-V -> CI-V Address: 94h
- * CI-V -> CI-V Transceive: ON
- * CI-V -> CI-V Output (for ANT): OFF
- * CI-V -> CI-V USB Port: Unlink from [REMOTE]
- * CI-V -> CI-V USB Baud Rate: Auto
- ** CI-V -> CI-V USB Echo Back: ON OFF
- * USB Serial Function: CI-V
- * USB Send/Keying -> USB SEND: OFF
- * USB Send/Keying -> USB Keying (CW): OFF
- * USB Send/Keying -> USB Keying (RTTY): OFF
** = Change
Menu -> Set -> Connectors ->
-
Menu -> SET -> Function ->
- Time-Out Timer (CI-V): 3min
IC 7610 Click to select radio
IC-7610 Firmware version should be at least 1.3 or higher.
-
* = Default
- * ACC AF/IF Output -> Output Select: AF
- * ACC AF/IF Output -> AF Output Level: 50%
- * ACC AF/IF Output -> AF SQL: OFF (OPEN)
- * USB AF/IF Output -> Output Select: AF
- * USB AF/IF Output -> AF Output Level: 50%
- * USB AF/IF Output -> AF SQL: OFF (OPEN)
- * MOD Input -> USB MOD Level: 50%
- ** MOD Input -> DATA OFF MOD: USB MIC,ACC
- * CI-V -> CI-V Baud Rate: Auto
- * CI-V -> CI-V Address: 98h
- * CI-V -> CI-V Transceive: ON
- * CI-V -> CI-V Output (for ANT): OFF
- * CI-V -> CI-V USB Port: Unlink from [REMOTE]
- * CI-V -> CI-V USB Baud Rate: Auto
- ** CI-V -> CI-V USB Echo Back: ON
- * USB SEND KEYING -> USB SEND: OFF
- * USB SEND KEYING -> USB Keying(CW): OFF
- * USB SEND KEYING -> USB Keying(RTTY): OFF
- * USB SEND KEYING -> Inhibit Timer at USB Connection: ON
** = Change
Menu -> Set -> Connectors ->
-
Menu -> SET -> Function ->
- Time-Out Timer (CI-V): ON - 3min
IC 705 Click to select radio
Warning: This only works on a Raspberry Pi 4B ✓
Firmware version should be at least 1.27 or higher.
-
Menu -> Set -> Display ->
- Opening Message: -> OFF
- Power On Check: -> OFF
-
Menu -> Set -> Connectors ->
- MOD Input -> USB MOD Level: 50%
- MOD Input -> DATA OFF MOD: USB MIC,USB
- CI-V -> CI-V Address: A4h
- CI-V -> CI-V Transceive: ON
- CI-V -> CI-V USB Echo Back: ON
- USB AF/IF Output -> AF SQL: ON
-
Menu -> SET -> Function ->
- Power Off Setting: -> Standby/Shutdown
- USB Power Input: -> OFF
- Time-Out Timer (CI-V): ON - 3min
IC 756PROII & III Click to select radio
-
Menu -> Set -> Miscellaneous (others) set mode ->
- CI-V -> CI-V Baud Rate: 9600
- CI-V -> CI-V Address: 53h
- CI-V -> CI-V Transceive: ON
-
Additional Hardware:
- USB Serial adapter Here ✓
- Serial to CI-V adapter Here ✓
- USB Audio adapter Here ✓
- Audio interface Here ✓
- Power On-OFF Relay module to GPIO 23 Here ✓
-
Radio Controls ->
- AF Volume Control -> pre-set 15 adjustable in web app
- Radio Interface between Radio / Raspberry Pi Required -> Here ✓
Yaesu
FT 450 Click to select radio
FT 450 CAT Radio ID 0241 (Fixed value)
-
Menu Mode ->
- CATRATE -> Select: 9600
- CAT RTS -> Select: OFF
- TOT (TOT TIME) -> Select: ON - 3min
-
Radio Controls ->
- AF Volume Control -> pre-set 15 adjustable in web app
- Radio Interface between Radio / Raspberry Pi Required -> Here ✓
FT 950 Click to select radio
FT 950 CAT Radio ID 0310 (Fixed value)
-
Menu Mode ->
- 026 GENE CAT BPS -> Select: 9600
- 028 GENE CAT RTS -> Select: OFF
- 031 GENE TX TOT -> Select: ON - 3min
-
Radio Controls ->
- AF Volume Control -> pre-set 15 adjustable in web app
- Radio Interface between Radio / Raspberry Pi Required -> Here ✓
FT 2000 Click to select radio
FT 2000 CAT Radio ID 0251 (Fixed value)
-
Menu Mode ->
- 028 GEnE CAT BPS -> Select: 9600
- 030 GEnE CAT RTS -> Select: OFF
- 035 GEnE TX TOT -> Select: ON - 3min
-
Radio Controls ->
- AF Volume Control -> pre-set 15 adjustable in web app
- Radio Interface between Radio / Raspberry Pi Required -> Here ✓
FT 710 Click to select radio
Warning: This only works on a Raspberry Pi 2B - 3B - 3B+ ✓
Issue: On the first boot it will prompt to reboot the Raspberry Pi just click [ OK ]
FT 710 CAT Radio ID 0800 (Fixed value)
-
FUNC -> OPERATION SETTING
- GENERAL ---------> CAT-1 RATE: 9600 (38400bps default)
- GENERAL ---------> CAT-2 RATE: 9600 (4800bps default)
- GENERAL ---------> TX TIME OUT TIMER: 3min (OFF default)
-
FUNC -> DISPLAY SETTING
- EXT MONITOR ---------> EXT DISPLAY: OFF (default)
ON to stream EXT-Display
-
FUNC -> RADIO SETTINGS
- MODE SSB ---------> RPPT SELECT: OFF (default)
- MODE AM ----------> RPPT SELECT: OFF (default)
- MODE FM ----------> RPPT SELECT: OFF (default)
- MODE PSK/DATA -> RPPT SELECT: OFF (default)
- MODE RTTY -------> RPPT SELECT: OFF (default)
-
FUNC -> CW SETTINGS
- MODE CW ---------> RPPT SELECT: OFF (default)
- MODE CW ---------> PC KEYING: OFF (default)
Connect the Radio to the Raspberry Pi
- ICom - Plug the USB cable into the Raspberry Pi the other end into the radio
Click to show Diagram IC 756

Click image to enlarge
- Yaesu non USB, Plug the USB Audio Adapter into the Raspberry Pi, the mic-spkr to the Radio Interface. Mic-spkr from the Interface to the mic-spkr on the radio. Plug the USB Serial Adapter into the Raspberry Pi. Plug the Serial end into the Radio Serial port.
Click to show-hide Diagram FT 710

Click image to enlarge
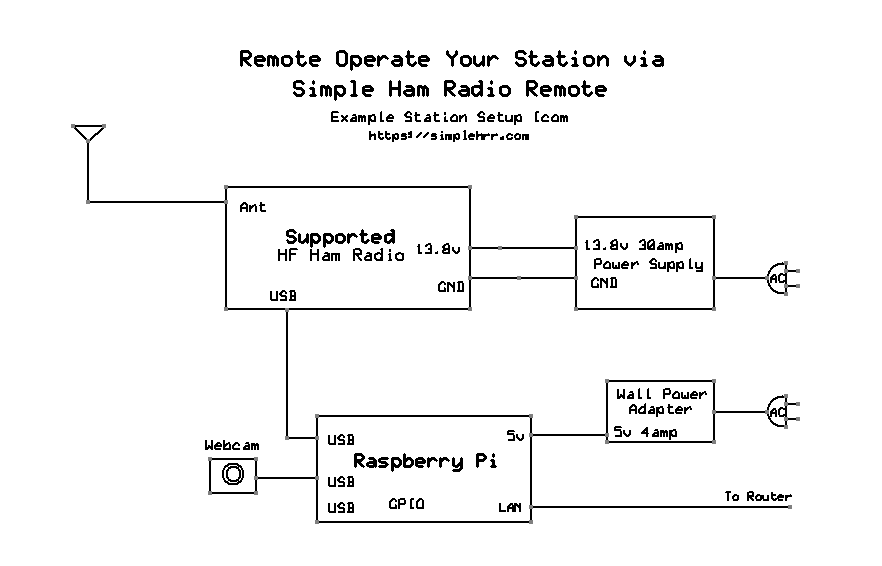
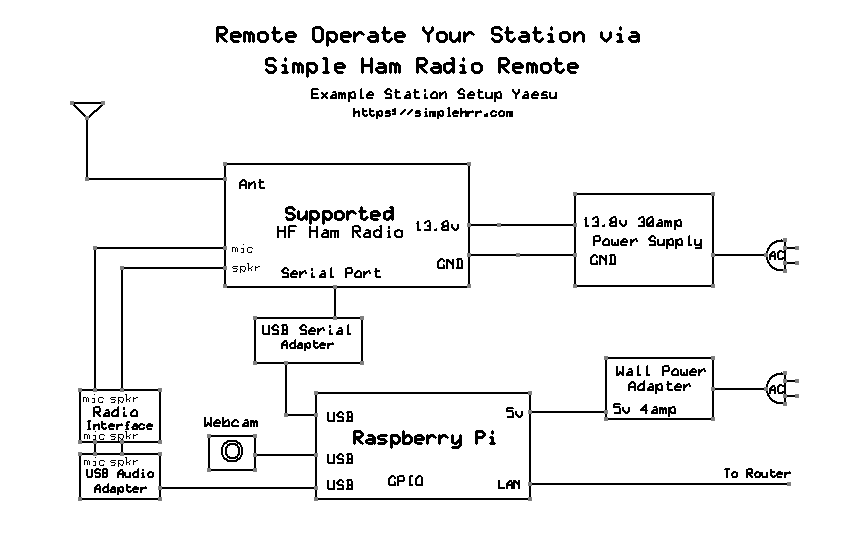
Connect the Raspberry Pi to Network
- Plug the Cat5 cable into the Raspberry Pi Ethernet port the other end to the LAN.
Booting the Raspberry Pi for the First Time
- Insert the flashed microSD card into the Raspberry Pi microSD slot.
- Power ON the Radio.
- Power ON the Raspberry Pi.
- Wait for the Pi to boot up - the green LED should stop flashing when it's finished!.
Get the Raspberry Pi IP Address
- Open a browser and Log in to your router as admin. The router IP address is usually something like 192.168.0.1, 192.168.1.1 or 192.168.1.254 or 10.0.0.1
- Find Attached Devices -> Device Name (Raspberry Pi simplehrr) - IP Address
(something like 192.168.x.x or 10.x.x.x). - Write down or copy the corresponds IP Address you will need that to set up Simple Ham Radio Remote.
Set up Simple Ham Radio Remote on your Raspberry Pi
- Turn the radio ON
- Open a Chrome or Firefox web browser enter the URL:
https://your-Pi's-IP-address:50000/remote - Enter Username: Ham Radio Callsign (confirmed on QRZ.com)
- Enter Email address: Optional: Just leave noemail@noemail.com
- Enter Password: (greater then 8 char)
- Select Radio:
- Select Dev USB: IC7300-7610-756 (/dev/ttyUSB0) IC705 (/dev/ttyACM0)
FT450-950-2000 (/dev/ttyUSB0) FT710 (/dev/ttyUSB1) - Click [ Activate ]
- Verify the information is correct Click [ OK ]
- Wait 1 minute for Raspberry Pi to reboot
- Click [ OK ]
- Enter Username: (your Callsign)
- Enter Password: (your Password)
- Click [ Sign in ]
- Click [ Call Radio ] (when it turns green)
Be patient it takes a little longer to turn green on a first time install.
Logout:
- Click [ Hang Up ]
That's it.
Read me:
- First time boot: takes about 2+ minutes all prerequisites are installed during the first boot. Wait 2 minutes, then start checking https://your-Pi's-IP-address:50000/remote.
- If you don't have the selected radio connected to the USB-Serial port, when you click [ Call Radio ], you will get an error message "Unable to Connect to Radio!".
- This installation is for LAN access only. Port Forwarding required for Internet access.
- Access the user manual using your username and password the day after setting up SimpleHRR.
- (SSH) access to the Raspberry Pi (See the User Manual: Log into your Raspberry Pi) to maintain the operating system or to install additional ham radio applications for your station.
- Simple ham radio remote uses generic CI-V and CAT commands, so it may work with other Icom and Yaesu amateur ham radios.
- Radio ID for Yaesu FT 450 - 950 - 2000 - 3000 can be found in the Yaesu FT-Model CAT Operation reference book.
- Do not use VOX remotely there is no TX feed back indicating that the radio is transmitting.
- Any time you power ON or reboot the raspberry pi - Turn the radio ON first.
- Always review the FCC rules - regulation before operating any two-way radio remotely
- Current Release notes:
Simple ham radio remote web app is fully functional, but still in the process of refining some aspects of the web app.
Check back periodically to download the most recent release.
2026-05-06-0.2.1-T-a-simplehrr-icom-yaesu-lite.zip
Fixed minor issues setup
Updated set-up
2026-04-25-0.2.1-T-a-simplehrr-icom-yaesu-lite.zip
Trixie release update
RPi 3B Trixie OS Green LED flashing:
See User Manual for solution
Fixed issues activation webpage
setamixer.sh pre-set alsamixer levels
Fixed other minor issues
2026-01-23-0.2.1-T-simplehrr-icom-yaesu-lite.zip
New Trixie release
Tested on: IC 705-7300-7610 FT 710-2000
Tested on: Raspberry Pi 2B 3B 3B+ 4B and 5
One Issue RPi 3B Trixie OS Green LED flashing
not sure why it's flashing Trixie OS RPi 3 B only
Log book app adif log format
Fixed some minor issues
2025-03-24-0.2.1-f-simplehrr-icom-yaesu-lite.zip
New FT 710 First release
Fixed some minor issues
2024-12-21-0.2.1-f-simplehrr-icom-yaesu-lite.zip
Update IC-705 VHF-UHF PL tone CTCSS-Simplex-Duplex-+
New GPIO 25 to switch ant1-ant2 on MFJ-4712 Ant Switches
Cleaned up the User Interface
2024-10-28-0.2.1-f-simplehrr-icom-yaesu-lite.zip
Fixed GPIO pwr on-off icom and server
2024-10-21-0.2.1-f-simplehrr-icom-yaesu-lite.zip
Added IC-705 HF-USB-RPI 4 only
Added "Stand by" gpio power On to let radio boot up
Added "Device" set-up.js - Change Current Radio
Changed "Mode" RTTY to FM no SQL on remote audio
Fixed webcam popup window resize
2024-10-15-0.2.1-f-simplehrr-icom-yaesu-lite.zip
Android with Chrome:
fixed transmits short noise burst
at beginning of every HF transmission.
2024-09-29-0.2.1-f-simplehrr-icom-yaesu-lite.zip
Fixed GPIO Raspberry Pi
Fixed GPIO Le Potato
Fixed USB Audio select
2024-09-04-0.2.1-f-simplehrr-icom-yaesu-lite.zip
Fixed refresh issue Band-Mode popup
2024-07-20-0.2.1-f-simplehrr-icom-yaesu-lite.zip
More code cleaned up
2024-07-15-0.2.1-f-simplehrr-icom-yaesu-lite.zip
Fixed no microphone audio issues
2024-07-04-0.2.1-f-simplehrr-icom-yaesu-lite.zip
Fixed some minor issues
2024-06-08-0.2.1-f-simplehrr-icom-yaesu-lite.zip
User Interface (UI) update
Added S meter / S Meter on-off switch
Added GPIO pin to power ON-OFF older CI-V - CAT support radios
Updated the radio ID process to support most Icom CI-V - Yaesu CAT capable radios
2024-05-01-0.2.1-f-simplehrr-icom-yaesu-lite.zip
First icom-yaesu release
*SimpleHRR is the short name Simple Ham Radio Remote.¹ web app is application software that is accessed using a web browser.