Ham Radio Remote Control
Installation Guide
Simple Ham Radio Remote Control is a free ¹web app, it comes preinstalled on a Raspbian Lite Image which is flashed onto an 8GB or larger microSD card using your favorite software to flash microSD cards. There is no additional software to install.

System requirements
- Ham Radio Callsign
- Chrome or Firefox web browser
- Admin access to your router
- Active Internet connection
Hardware required
- VHF, UHF, HF, HT Amateur Ham radio transceiver
- Micro SD card adapter
- Micro SD card (8GB class 10 or larger)
- Raspberry Pi (3B - 3B+ or 4B armv7l)
- Raspberry Pi Power Supply 2.5A - (3A - 3.5A better)
- Cat5 Ethernet cable
- USB Audio Adapter
- Audio Interface - Example Ham Radio Remote Control Radio Interface Here ✓
- Two One Channel 12v Relay Module Relay Switch
- Computer with an SD slot (or an appropriate SD card adapter)
Download, Install the Image onto your microSD card
- This image contains everything you need to get up and running quickly.
- Download: SimpleHRR PTT v0.2.1-T.
Simple ham Radio Remote simplehrr-ptt Current release...
Windows: Install the Image onto your microSD card
- Download: SimpleHRR PTT v0.2.1-T.
- Extract the image double-click the .zip file then click Extract All.
- Insert the microSD card into the computer's SD card slot use the SD card adapter if needed.
- Next, flash the image to the microSD card with your favorite image writer. There are various image writer you can use, example Etcher - Raspberry Pi Imager works for Linux, macOS or Windows.
- Now remove the flashed microSD from the computer, keep it in a save place will insert it into the Raspberry Pi later.
Prepare the Radio for Remote Operation
- Install a radio interface between radio and the Raspberry Pi example Here ✓
Connect the Raspberry Pi to Network
- Plug the Cat5 cable into the Raspberry Pi Ethernet port the other end to the LAN
Booting the Raspberry Pi for the First Time
- Insert the flashed microSD card into the Raspberry Pi microSD slot
- Power ON the Raspberry Pi
- Wait for the Pi to boot up - the green LED should stop flashing when it's finished!
Get the Raspberry Pi IP Address
- Open a browser and Log in to your router as admin. The router IP address is usually something like 192.168.0.1, 192.168.1.1 or 192.168.1.254 or 10.0.0.1
- Find Attached Devices -> Device Name (Raspberry Pi simplehrr-ptt-o-ip) - IP Address
(something like 192.168.x.x or 10.x.x.x). - Write down or copy the corresponds IP Address you will need that to set up Simple Ham Radio Remote.
Set up Simple Ham Radio Remote Control on your Raspberry Pi
- Open a Chrome or Firefox web browser enter the URL:
https://your-Pi's-IP-address:60000/ptt - Enter Username: Ham Radio Callsign (confirmed on QRZ.com)
- Enter Email address: Optional: Just leave noemail@noemail.com
- Enter Password: (greater then 8 char)
- Select Radio: (P2P-PTT)
- Select Dev USB: (/dev/ttyUSB0)
- Click [ Activate ]
- Verify the information is correct Click [ OK ]
- Wait 1 minute for Raspberry Pi to reboot
- Click [ OK ]
- Enter Username (your Callsign)
- Enter Password (your Password)
- Click [ Sign in ]
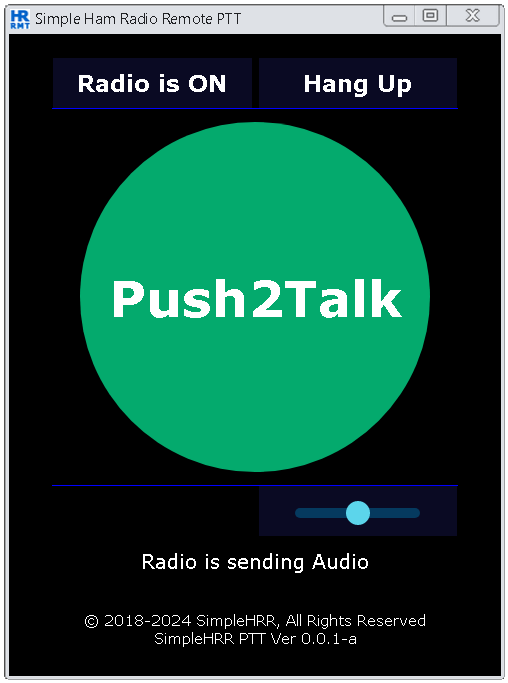
- Click [ Call Radio ]
- Click [ Start Audio ]
- Click or Press [ PTT ] to Transmit Logout:
- Click [ Hang Up ]
That's it.
Read me:
- First time boot: takes about 2+ minutes all prerequisites are installed during the first boot. Wait 2 minutes, then start checking https://your-Pi's-IP-address:60000/ptt.
- This installation: is for LAN access only. Port Forwarding required for Internet access.
- Fist time [ Call Radio ]: take's about 15 seconds to connects after that it is a lot faster.
- IOS iPhone Safari: iPhone 12 Pro max v17.2.1.
- IOS Safari issues during testing: will not Logout unless the session and tab are removed.
- Android phone Chrome : no issues during testing.
- Win7-10-11 PC Desktop-Laptop Chrome-Firefox: no issues during testing.
- Supported Radios: VHF, UHF, HF, HT Amateur Ham radio transceiver.
- CTCSS (PL) Tones Frequencies; Set in the Admin drop-down volume set in dB (-20dB)
- User-selectable GPIO pins use any available GPIO pin.
- Preset GPIO pins: ground pin-14, Power ON/OFF GPIO 23-16 , Push2Talk GPIO 24-18.
- Web app test setup: Icom IC-2AT with IC-2AT Radio Interface.
- Always review the FCC rules - regulation before operating any two-way radio remotely
- Current Release notes:
Simple ham radio remote control web app is fully functional, but still in the process of refining some aspects of the web app.
Check back periodically to download the most recent release.
2026-02-05-0.2.1-T-simplehrr-ptt-lite.zip
New Trixie release
Fixed a lot of issues
2024-07-18-0.0.1-a-simplehrr-ptt-lite.zip
Fixed some minor issues
2024-04-18-0.0.1-a-simplehrr-ptt-lite.zip
First release
Related Links
*SimpleHRR PTT is the short name Simple Ham Radio Remote Control. ¹ web application (or web app) is application software that is accessed using a web browser.
